
3-Step Startup Guide
1. Add the Indicator $TRADEATOMY Trading Mate on your chart.
2. Define your Inputs:
a. Set up the rectangle filters as per your requirement.
b. Define a distinct Group or work with the default “auto” mode.
3. Start drawing your setups using the Rectangle Drawing Object.
Video Tutorial
1. Rectangle Filter
To allow users to keep the Indicator activated and still work with Rectangles for other purposes, the indicator provides user inputs to specify which Rectangles will be adopted by it.
These two inputs are “FillColor Filter” and “Border Style Filter”.
There are three ways to adopt rectangles in the indicator.
-
Either the filters are equal to the user’s default FillColor & Border Style. In this case, any new drawn rectangle is adopted immediately.
-
The second option is to take any rectangle on the chart and change its format, so it fits the two input filters. This rectangle will be adopted on the next click after making its format fit the filters.
-
Filters are turned off and every object is adopted.
The available input values for the filters are described in chapter 5. User Settings.
2. Trade Planning
2.1 Long and Short Scenario
To work in a long scenario, start drawing the rectangle from left to right.
If the end is lower than the start, it is considered to be the entry to the stop loss. Example on the left.
Otherwise, entry price to the profit target.
The app complements the other side of the trade setup.
To work in a short scenario, start drawing the rectangle from right to left.
If the end is higher than the start, it is considered to be the entry to the stop loss. Example on the left.
Otherwise, entry price to the profit target.
The app complements the other side of the trade setup.
The direction of the rectangles can always be changed, so if the creation went “wrong”, the edges can be dragged to where they are supposed to be. If the input Automatic Color is true, the colors make it easy to identify the scenario.
2.2 Trade Setup Details
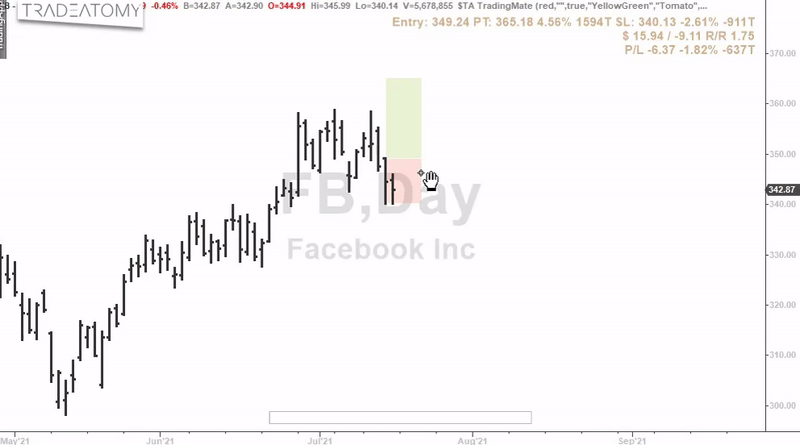
A trade setup is the pair of rectangles with a defined entry, stop loss and profit target price.
The details of a trade setup are displayed on the chart.
It displays:
Entry Price
Profit Target (PT) Price, Percent and Ticks
Stop Loss (SL) Price, Percent and Ticks
The profit/loss potential in the currency
Reward/Risk (R/R) ratio of the setup
Theoretical real-time open P/L
It does not take any real position into account, it simply shows the cash value for a theoretical position from the entry to the current last price.

The trade setup details can be customized using the indicator's inputs.
You can define the position of the text, the font size, font color and turn optional information like percent values, ticks, real-time P/L on/off.
For more details please refer to chapter 5. User Settings.
2.3 Trade Setup Defaults
The indicator input Reward/Risk Default allows you to specify a default Risk/Reward ratio that is applied to a newly created setup.
2.4 Snap Mode
You draw roughly on the chart.
Trading Mate snaps to the exact prices automatically.
An animation shows you where the snapping took place and the applied Tick Shift is shown in parentheses.
You configure the sensitivity using the input Snap Mode % and the prices that fit your trading style using the input Snap To.
Prices you can snap to:
-
Open
-
(true)High
-
(true)Low
-
Close
All bars within the rectangle are evaluated.

The TradeStation drawing snap mode for rectangles is difficult for our purpose and can/should be turned off.
2.5 Tick Shift
The idea is to have a comfortable solution for the common requirement of buying the breakout X ticks above the high or to place the stop at the low minus X ticks.
In a long scenario, the number is added to the entry price and subtracted from the stop loss. The reverse is true for the short scenario.
To invert the logic, a user can input negative numbers.
Tick Shifts are performed directly on the rectangles. They are applied whenever the respective price is changed.
However, to enable repositioning of the setup, the rectangles can be dragged to another location without the repeated reapplication of the tick shifts.

2.6 Edit Trade Data
Trade setup data can also be edited from the Edit Trade Data pop-up. It can be displayed by holding the ALT key and clicking on a rectangle or by right-click context menu > Edit Trade Data.

*Shortcut keys can be changed. See chapter 6. Advanced Settings.
2.7 Delete Trade Setups
Trade setup data can be deleted by holding the CTRL key and clicking on a rectangle or by right-click context menu > Delete.

*Shortcut keys can be changed. See chapter 6. Advanced Settings.
2.8 Right-Click Context Menu

The majority of the features are easily accessible from the right-click context menu.
The menu item Lock allows you to lock the setup to prevent unintentional changes.
Set Reward/Risk enables the quick setting of a reward/risk ratio. The basis for the R/R setting is the rectangle which is selected with the right-click.
If the right-click is done on the Stop Loss rectangle and a R/R ratio of 2 is chosen, the profit target is changed to two times the stop loss.
2.9 Global Trade Setups
Trade Setups can be replicated real-time across multiple (timeframe) charts.

The replication works if the indicator is added and enabled on the charts.
The controlling parameter for the synchronizing of the trade setups is the input Group.
-
A Group enables to control, which trade setups replicate to which chart.
-
The name of the group is freely definable. It could, for example, be “Apple Longterm”.
-
You can use the placeholders @symroot and @sym (case-sensitive) to dynamically include the ticker symbol in the group name. “My@symSpecial” will result in the group name “MyAAPLSpecial”.
@symroot will be replaced with the symbol root.-
That is for futures the contract without @ and any extension. The root of @ESH22.D is ES.
-
For options, that is the leftmost portion of the complete stock or index option symbol prior to the space. The root of SPY 220107C476 is SPY.
-
-
If the input is set to “auto” or “”, then the Group is the symbol root. This can be used, if no individual grouping is required. The default and recommended value is "@sym".
The Trade Setups data is saved on the PC in XML format. The setups are thus independent of the chart. They are restored whenever the indicator with the respective group is active on a chart.
3. Order Placement
3.1 Order Placement Setup
To place orders directly from the indicator, a right click on any of the rectangles shows a context menu with different order combinations.
You need to give explicit consent that the indicator is enabled to place orders. This is done by activating the checkbox in the indicator settings. This needs to be repeated on every new insertion of the indicator or when copying a chart with the indicator applied on.
If not enabled, TradeStation shows an error message when trying to place orders.
With the application of the Order Placement feature, the user accepts sole responsibility for any resulting orders placed from the indicator. It is mandatory for the user to review and understand all placed orders. Furthermore, the user agrees to have read the disclaimer at the end of this manual, on tradeatomy.com and respective information at tradestation.com and tradestation.tradingappstore.com.


The orders are placed with the indicator for the selected account in one of the right-click menus:
-
Format Account Numbers for Orders and Position
-
Format Account Orders and Positions…
You can also turn on the display of order lines here.
TradeStation‘s indicator Chart Trading does also react on the user actions: ctrl+left mouse click, alt+left mouse click and dragging of orders on the chart. In order to prevent unintended actions from Chart Trading, disable it or turn it off.
Also, take notice of the fact that if you move orders with Chart Trading, Activation Rules are not retained. This pertains entry orders of order type Pullback Limit Order PB: X %.
3.2 Order Size and Risk Management
The order placement submenu shows the number of contracts along with the theoretical trade risk.
The first entry in the selection of the contract is the contracts/shares suggested based on your defined risk with input Trade Risk. In the example on the right, $5000.
See chapter 5. User Settings on how to configure the number of contracts/shares and the increments.

The order buttons in the right-click context menu provide five different kinds of order combinations explained in the following chapters.
3.3 Stop Order
A Stop Order is placed on the entry price, for long/short scenario, respectively.
In case the entry order gets filled, an order-cancels-order (OCO) is sent for the profit target and stop loss.
If either the profit target or stop loss gets filled, its peer gets canceled.


3.4 Limit Order
A Limit Order is placed on the entry price, for long/short scenario, respectively.
In case the entry order gets filled, an order-cancels-order (OCO) is sent for the profit target and stop loss.
If either the profit target or stop loss gets filled, its peer gets canceled.

3.5 Pullback Limit Order PB: X %
Use this order combination only when you have a thorough understanding of activation rules!
X is a user input, see chapter 5. User Settings.
A Limit Order with activation rule (AR) is placed X % of the entry price to stop loss distance from the entry price. The activation rule of the entry order defines that the entry price of the setup needs to be hit or exceeded. Only then the limit order for the entry becomes active.
In case the entry order gets filled, an order-cancels-order (OCO) is sent for the profit target and stop loss. If either the profit target or stop loss gets filled, its peer gets canceled.


Example for Pullback Limit Order PB: X %
-
A trader wants to buy Amazon shares on a 30% pullback of a 100% range, but only if Amazon breaks out of the recent highs.
A Limit Order with an activation rule (AR) is placed 30% below the entry price.
-
The trader checks the placed orders in the TradeManager and verifies the activation rule in column Advanced.


3.6 Stop + Pullback Limit Order PB: X %
X is a user input, see chapter 5. User Settings.
This order combination is a combo of 3.3 Stop Order and 3.5 Pullback Limit Order PB: X %.
There is no activation rule, The pullback limit order is sent by the fill of stop order.
Since it adds an equally sized pullback entry order, the contract/shares amount is always an even number (e.g. 2, 4, 6, etc.). Thus, it is only provided for even numbers occurring with the contracts/shares min, max, and increment settings.
In case the entry order gets filled, an order-cancels-order (OCO) is sent for the profit target and stop loss.


3.7 Exit Only Bracket Order
An order-cancels-order (OCO) is sent for the profit target and stop loss.
If either the profit target or stop loss gets filled, its peer gets canceled.
This is used if the position is already open and only exit orders should be placed.


3.8 Trade Management
Orders can be moved with drag and drop to change your entry, trail your stop, etc.
A right-click context menu on the order objects enables the cancellation of orders.
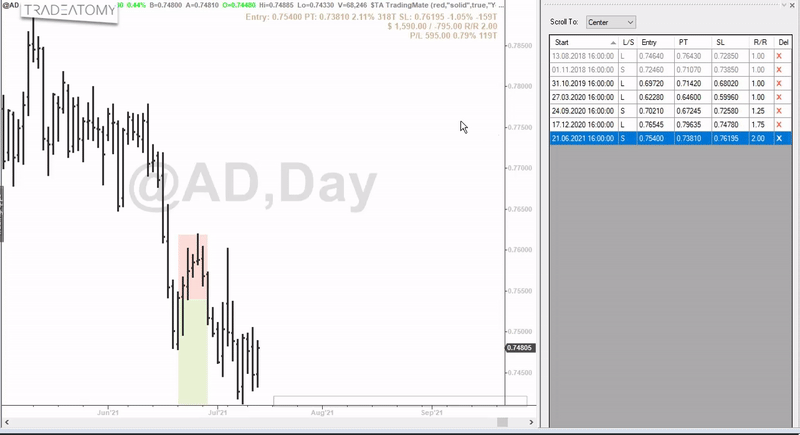
4. ListView
The ListView is a sidebar added to the chart listing all the setups of the respective Group.
It's main purpose is to facilitate backtesting using Trading Mate.
However, it can also be used to organize the Trade Setups.
-
Clicking on a row scrolls the chart to the respective setup.
-
Setups can also be deleted from the ListView by clicking the red X in the last column.
-
Setups that are out of the chart's range are shown in grey.
ListView can be turned on/off from the right-click context menu. There is also an input Show ListView to turn it on by default.
5. User Settings

-
FillColor Filter
Rectangles with this color are adopted by the indicator. Enter -1 to turn the filter off.
-
Border Style Filter
Rectangles with this style are adopted by the indicator.
Possible values: “solid”, “dotted”, “dashed”, “dashed2”, and “dashed3”.
"" to turn the filter off.
-
Automatic Color
Set True to enable automatic coloring. Positive values are colored in Auto Color Positive and negative in Auto Color Negative. Enter false to turn off.
-
Auto Color Positive
Enter the color of positive cash values (profit targets).
-
Auto Color Negative
Enter the color of negative cash values (stop loss).
-
Text Position
Set the position of the Trade Setup Details text on the chart.
Possible values: “topRight”, “bottomRight”, “aligned”.
-
Text Color
Color for the Trade Setup Details text.
-
Font Size
Enter the font size of the Trade Setup Details text.
-
Show P/L %
Enter true/false to show P/L in %.
-
Show P/L Ticks
Enter true/false to show P/L in ticks.
-
Show Open P/L (Profit/Loss)
If set to true, it shows the theoretical real-time open P/L with the text.
It does not take any real position into account, it simply shows the cash value for a theoretical position from the entry to the current last price.
Tip: To save processing power, uncheck the option “Update value intra-bar (tick-by-tick)” on the “General” tab of the indicator format dialog. It then only updates on clicking the Rectangle or when a bar is finished.
-
Reward/Risk Default
Default Reward/Risk ratio applied to newly drawn setups.
-
Snap To
Values to snap to
Open=O, High=H or True High=TH, Low=L or True Low=TL, Close=C, separated by commas. The example above snaps to True Highs, True Lows, and Closes.
The snapping happens after releasing the rectangle and it snaps to the closest possible Snap To found that is within the border of the rectangle.
-
Snap Mode %
Number in percent of the 20 bar average true range that defines the distance for prices to be considered for Snap Mode.
Enter 0 to turn off snap mode.
Tip: Turn off the native TradeStation “Snap Mode” located in the Drawing menu when using this snap mode. Native “Snap Mode” is difficult for our purpose with rectangles.
-
Tick Shift Entries
Number of ticks to shift prices by for entries.
Set to 0 to turn off.
-
Tick Shift Stop Loss
Number of ticks to shift prices by for stop loss.
Set to 0 to turn off.
-
Trade Risk
Risk per trade, number of contracts/shares is calculated to fit the trade risk. 0 = off.
-
Contracts/Shares Min
Minimum number of contracts/shares to place orders for.
-
Contracts/Shares Max
Maximum number of contracts/shares to place orders for.
-
Contracts/Shares Increment
Increments (step size) for the number of contracts/shares.
-
Pullback Ratios
Pullback ratios for the pullback orders. Multiple values, separated by commas, are possible. Decimal numbers can be used.
-
Group
Define a Group, and the lines are replicated on charts with the same Group.
Any name is possible.
The placeholders "@symroot" and “@sym” can be used to dynamically add the ticker symbol.
-
Show ListView
Enter true/false to show the ListView when starting the indicator.
6. Advanced Settings
-
The advanced settings are in an XML file and can be found at:
C:\Users\<your username>\Documents\tradeatomy\$TA_TradingMate\Settings.xml
-
Shortcut_Delete, Shortcut_EditPrices
Define custom shortcuts to delete setups and open the Edit Trade Data dialog.
The available keys are CTRL, ALT, and SHIFT.
A combination of two keys can be defined using a + between the keys.

-
The indicator must be restarted after the XML file has been changed.
-
You can restore the default Settings.xml by deleting it and restart the indicator.
The Trade Setup data is saved in XML format on your PC and can, therefore, be restored whenever needed.
That also enables the import of the Trade Setups into other TradeStation installations.
3-Step Startup Guide
1. Add the Indicator $TRADEATOMY Global TrendLines on your chart.
2. Define your Inputs:
a. Decide the drawing objects to work with
b. Set up the filters as per your requirement.
c. Define a distinct Group or work with the default “auto” mode.
3. Repeat step 1 & 2 on further charts.
All the rest is done automatically by the Indicator.
Nonetheless, after an initial impression, I recommend to watch the video series below to learn and understand how to use the study most effectively.
1. Upgrade from Version 8
2. Installation and Setup
Filters
-
Color Filter
Drawings with this color are adopted by the indicator. Enter "" to turn the filter off.
Available TS Colors
-
Style Filter
Drawings with this style are adopted by the indicator.
Possible values: “solid”, “dotted”, “dashed”, “dashed2” and “dashed3”.
Enter “” to turn filter off.
Grouping
-
A Group enables to control, which lines replicate to which Chart.
-
The name of the group is freely definable. It could, for example, be “Apple Longterm”.
-
You can use the placeholder @symroot and @sym (case-sensitive) to dynamically include the ticker symbol in the group name. “My@symSpecial” will result in the group name “MyAAPLSpecial”.
@symroot will be replaced with the symbol root.-
That is for futures the contract without @ and any extension. The root of @ESH22.D is ES.
-
For options, that is the leftmost portion of the complete stock or index option symbol prior to the space. The root of SPY 220107C476 is SPY.
-
-
If the input is set to “auto” or “”, then the Group is the symbol root. This can be used, if no individual grouping is required. The default and recommended value is "@sym".